Add informational link for guest access
and intro sentence
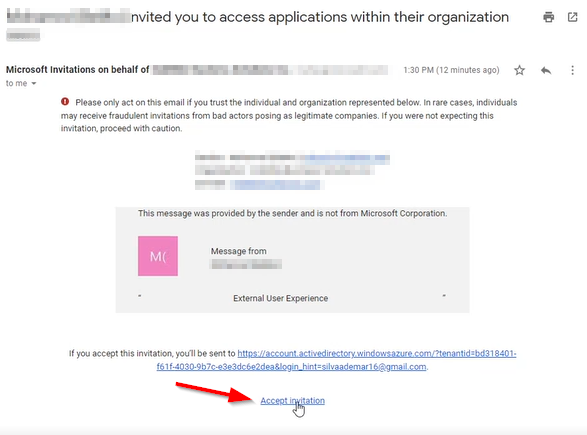
- The guest user will receive an invitation e-mail with the following/similar title: "(NAME) invited you to access applications within their organization"
- The guest user then should click on the button "Accept Invitation"
- Note: Make sure to check your spam/junk in case you don't see this email

- The guest user will then be prompted to create their account and solve the puzzle to confirm their identity.
- Click on Next.

- The guest user will review the permissions and click on Accept.

- The guest user might be prompted to verify their e-mail address, in which the security code they will find in the e-mail address if they are asked to do so.

- IMPORTANT! Now the guest user will be asked to set up the Microsoft Authenticator app so they can have a Multi-Factor Authentication method. This has to be done in order to access the company data.
- The guest user will download the Microsoft Authenticator app on their phone in case they haven't yet.
- add more details for the authenticator app.
- After the download is complete, click on Next.

- On the phone application, the guest user must select Add an account and proceed to choose Work or School. After this is done, click on Next as the screenshot below.

- Scan the QR code with your phone in the Microsoft Authenticator app and click on Next.

- After successfully setting up your account, the guest user will be redirected to the My Apps Page.
- Click on the arrow next to My Apps and select My Groups.

- The guest user will be able to see which groups they were assigned by the admin.
- Click on the group you want to access.

- Then, the guest user will be able to see the group links.
- For example, to access SharePoint, simply click on the SharePoint link.

- The guest user will be able to see the documents, notebooks, site contents, etc that they are allowed to by the Admin.

- If the guest user wants to access Outlook, they can simply click on the Outlook link on the page before (Access Panel).

- The Guest user will receive an Outlook Live account to communicate within the company.

- The guest user may also go to teams.microsoft.com to see which teams they are assigned to and access the content on the Microsoft Teams.

- They can simply click on the channels on the left to take a look at posts, files, and other tabs.

- There you go! The guest user experience is configured and ready to be used!

Comments
0 comments
Please sign in to leave a comment.